

How To Make Star Effect In Photoshop
Larn how to simulate the star filters that you place in front of your lens when taking a photo. Star filters are a great manner to make your night photos more interesting but if you don't accept any, you can do it easily in Photoshop. In this tutorial, you'll acquire an efficient way to simulate various types of star filters using nondestructive techniques. You'll also larn some great tips on using Smart Objects and how they can save you a lot of fourth dimension.
Star Filter Effect Photoshop Tutorial
Pace i
Showtime by duplicating the layer. Yous tin can exercise this by pressing Ctrl+J on Windows or Cmd+J on Macs.

Stride two
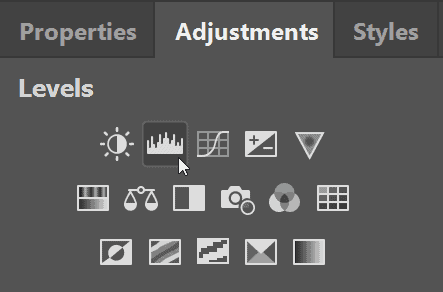
We're going to attempt to isolate this layer so that just the low-cal sources similar the lightbulbs and taillights are visible in the photo. To do this, we're going to apply the Levels aligning layer. Go the Adjustments console and then click on the Levels aligning button. If you don't see this console, yous can find it by going to Window > Adjustments.
In the Levels adjustment, drag the blackness input slider towards the right like this. This aligning will brand information technology so that only the brightest areas of your photograph are visible. What we're looking at at present is the design for the star effect.

Footstep 3
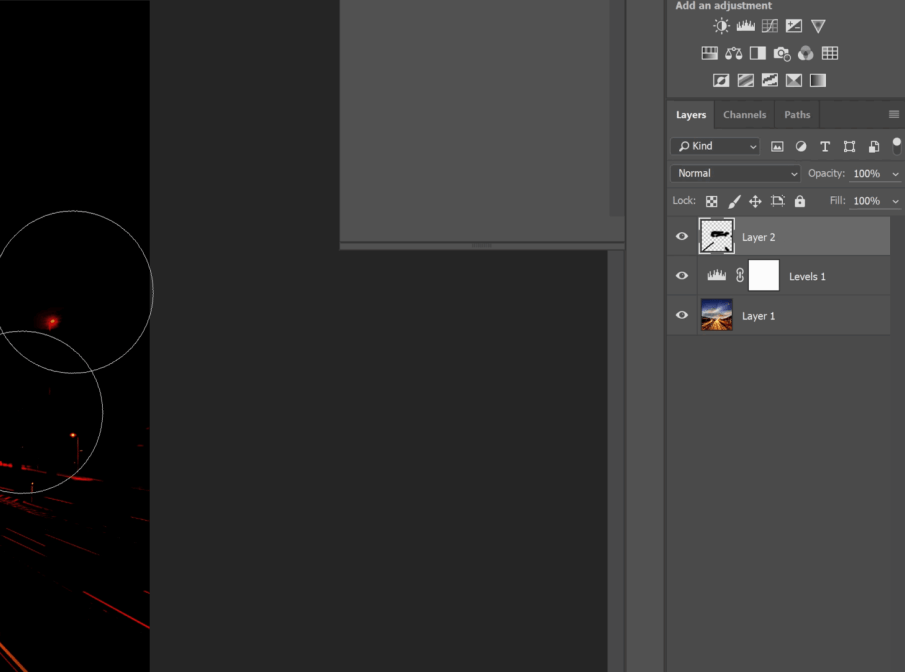
The star will radiate out from the bright areas such as the street lights and the taillights. Only we have some areas that we don't desire it to appear such equally the clouds. To remove this as a light source, nosotros're going to paint over it with blackness.

In your Layers panel, click on the New Layer button to add together a new layer. Select the Brush tool and set your foreground color to blackness. You can practise this quickly by pressing D on your keyboard to reset the foreground and background colors.

Select the Brush tool and look in the options bar to ensure that the mode is set to Normal and the opacity set up to 100%. Now correct-click anywhere on the certificate and pick a soft round brush. I like to keep the hardness prepare betwixt 0 and 50. Accommodate the size then pigment over the areas that y'all don't want the stars to appear. You don't need to be overly precise considering it won't make a big difference in the final results.

Step four
The side by side step is to merge the layers and add a motion blur. Virtually people merge layers past pressing Ctrl/Cmd+East. Merely when you do this, yous can't go back and make changes to these layers in the future. A ameliorate way of doing this is to merge them into something called a Smart Object. To do this, select the three layers (select multiple layers past holding the Ctrl/Cmd central). Correct-click on the layers then select "Convert to Smart Object". Your layers are now merged, just the awesome affair about Smart Objects is that you can doubleclick on the layer and make any edits you want.

Stride 5
There'south also another practiced reason to use Smart Objects and you'll see why soon. Commencement, allow'due south add a motion mistiness to this layer by going to Filter > Mistiness > Motion Blur. Adjust the distance to command how large you want your star to be. Next, adjust the angle. I typically similar to kickoff at 45 degrees which will make it mistiness diagonally. If y'all want your star filter to look slightly tilted and more natural, you tin can add a couple degrees to it – such equally using 47 degrees instead of 45 degrees. When you're done, click OK to apply the filter.

Step six
We at present accept one part of the star but the flares have quite a square edge. To better the results, nosotros tin apply the Move Blur filter two more times. You can do this by going to the Filter menu and selecting the kickoff option. Or you tin can press Ctrl/Cmd+F (Ctrl/Cmd+F for Photoshop CC).

Do this twice and you lot'll go a sharper flare.

Step seven
We're going to add together the second part of the star. Duplicate the layer by pressing Ctrl/Cmd+J. We need the motility blur to go the contrary fashion but because this layer is a Smart Object, you'll see that there are filters applied to it in the Layers panel. This is the other benefit of using Smart Objects.

When you apply filters to Smart Objects, you get what'southward called Smart Filters. With Smart Filters, yous can but doubleclick on the filter to change the setting. So doubleclick on this Smart Filter to edit it. To make the flare mistiness the contrary direction, only make the bending a negative by adding a minus sign in forepart of information technology.

Pace 8
We have three Smart Filters and so do this again for the other ii. Doubleclick on the Smart Filter then add a minus sign to the angle.

Footstep nine
Now we can modify the blending mode to Screen and it'll blend with the layer below to create a iv betoken star. This is the simplest star you tin go.

If you desire something more advance like a 6 or 8 bespeak star, you can do so past creating some other layer. For a 6 point star, you'll demand iii layers. For an eight bespeak star, you'll need 4 layers.

I'm going to create a 6 point star so I'll duplicate the layer once by pressing Ctrl/Cmd+J. Now I have iii layers and I can edit the Movement Mistiness filters of this layer. For a horizontal flare, we can fix the angle to 0. But since I'm tilting my star filter, I'm going to add a couple degrees to it and go far ii degrees.

Repeat this for the rest of the Motion Blur filters.

Step 10
Select the bottom star layer then change the blending mode to Screen. It's at present blended into the photo but it's very faint and unnoticeable.

To meliorate it, we can add a Levels aligning layer. Go to the Adjustments panel and add a Levels adjustment. In the Layers panel, make sure that this layer is the top layer. If it's not, drag it to the acme.

Step xi
We tin make the flares more than visible by dragging the white input slider towards the left. But when we do information technology, it's affecting the unabridged image.

To go far so that information technology only affects i layer at a fourth dimension, click on this button hither. With this pick enabled, you'll see that there is an arrow in the Layers panel indicating that it'due south simply affecting the layer below it.

Step 12
We have another trouble and that is that it'southward merely affecting i of the star layers. Y'all tin solve this issue in two means. The first is to indistinguishable the Levels adjustment layer twice and add together them to the other star layers.

Or y'all tin can exercise what I prefer more which is to merge the star layers into a unmarried Smart Object. To do this, select the three star layers then correct-click and choose Convert to Smart Layer. Modify the blending manner back to screen and you're done.

Step 13
I'yard going to become back into the Levels adjustment and refine the settings so that the stars are even more visible. But y'all'll run across that when I do this, the middle of the image here becomes way too bright.

You can set this past painting the area black in the Layers Mask. But if we practice this it'll cut off the star flare and remove it. Although it looks fine on this epitome, it might not work and then well on other images.

Then hither'southward a amend way to practice information technology. Remember how we merged the layers into Smart Objects? Well this is where it comes in handy because you can doubleclick on the layer and now you can edit the layers inside. I'm going to become deeper by doubleclicking on the other Smart Object and now we can edit the low-cal source.
Pace 14
To dim sure areas, select the Castor tool then set your brush opacity to 50%. Expect in your Layers panel and brand certain you're editing the pinnacle layer. Paint over the areas you want to dim.

When you're done, save and close the document. And only like that, your stars have been updated. And you also don't need to repeat this with the other ii layers because those layers are the aforementioned Smart Object and they all get updated automatically. Then that's why you should use Smart Objects whenever y'all can. It's a huge fourth dimension saver.

We're done with this Smart Object too and so save and close the document and at present you have your awesome star filter effect!

Step 15
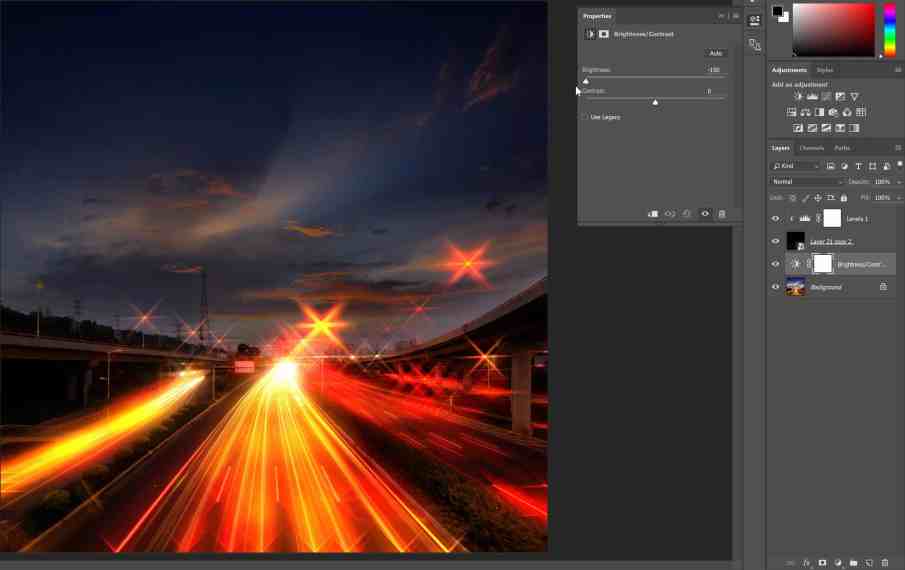
Just one more than tip before we end this Photoshop tutorial. If you desire to make the star flares fifty-fifty more than visible, just become to your Adjustments panel and add together a Brightness/Contrast adjustment. Position this layer below your star layer and and so dim the brightness.
Final Results
We're done! Here'southward how the paradigm looks similar earlier and after.

Before

After
Thank you
Thanks for reading this tutorial! Please subscribe to my aqueduct if y'all liked this video. I'd too love to hear your feedback then let me know what you think in the comments.
Summary

Article Name
How to Add a Star Filter Event in Photoshop
Description
Learn how to add a star filter effect in Adobe Photoshop.
Author
Denny Tang
Publisher Name
Denny's Tips
Publisher Logo

Source: https://www.dennystips.com/star-filter/
Posted by: shortyoursider71.blogspot.com
0 Response to "How To Make Star Effect In Photoshop"
Post a Comment